Wednesday, September 14, 2011

Fish and Chips

I am not a big fan of seafood.  I love shrimp and crab, but that's where the love ends.  My husband, however, loves fish and seafood and doesn't get it very often.  Last night I made fish and chips for him, once again using my mother's recipe, which I believe she got from her dad.

Classic fried fish has a batter or beer batter you dunk the fish into and then deep fry.  I choose to bread my fish similar to how I bread the tenderloins I make, but instead of bread crumbs, I use instant potato buds, or in other words, mash potatoes out of a box.  The only time I will EVER recommend their use. Instead of deep frying, I pan fry, which I find keeps the fish from being overly greasy.

Pan Fried Fish


What you'll need:

Fish, I used Cod
Eggs
Potato Buds
Flour
Salt and Pepper
Oil
Butter

Measurements are purposely left out because it never fails, I run out before I am finished breading the fish.

What you'll need to do:

Rinse your fish, lightly sprinkle with salt and pepper.  Dredge in flour, then egg and finally the potato buds. 
( yes, I am a very messy cook)


In a large frying pan, heat oil and butter. You will want about a half inch of oil in your pan and 4 tablespoons of butter.  When the butter is completely melted and bubbly, add your fish!  Brown on each side, which doesn't take more than a couple minutes per side.  Transfer to a baking sheet and keep warm in a 200 degree oven while you fry the rest.


Chips...A.K.A. Baked Potato Wedges

What you'll need:

Russet Potatoes
Olive Oil
Garlic Powder
Onion Powder
Salt
Pepper
Seasoning Salt
Cayenne Pepper


What to do:

Wash potatoes thoroughly, leaving the skins on!  Cut into wedges and keep in cold water until ready to use.  This will keep your potatoes from turning brown.  Always keep peeled and cut potatoes in cold water until ready to use for all recipes!

On a large baking sheet, generously pour olive oil on the bottom.  Roll the potato wedges in oil and line potatoes up with the skins on the bottom.  In the bowl you had your potatoes in, mix 1/4 c. of olive oil with a teaspoon or two of salt, pepper, garlic powder, onion powder, seasoning salt and a dash of cayenne pepper.


Spoon this mixture over the potatoes and bake at 450 degrees until the outsides are golden brown.

Sunday, September 11, 2011

Football Snacks

I woke up in an awesome mood yesterday, however it was a tad early at 3:30am, so I decided to cook for the Iowa game.  I would really rather not even mention yesterday's Hawk game, but it simply cannot be avoided.  My Hawks lost in triple over-time.  Needless to say after stuffing my belly all morning, the loss was a huge disappointment and inspired a nap as soon as ISU scored that finally touchdown.  It was a truly exciting game with an outcome we Hawkeye fans haven't seen in three years. 

Our friends, Brice and Shannon came over to watch the game with us.  Shannon brought a delicious Buffalo Chicken Dip that will definitely make the football snack list in this house!  I loved it!

I started our morning off with my mother's classic Monkey Bread recipe and added walnut pieces.


A raw veggie platter came next with a homemade Dill Dip my family loves!  Halftime brought Seven Layer Taco Dip and Crockpot Pulled Pork Sandwiches.


Seven Layer Taco Dip

What you'll need:

Large Can Refried Beans
1 Taco Seasoning Packet
16 oz. Cream Cheese
8 oz. Sour Cream
Salsa

Shredded Cheddar
Lettuce
Tomato
Onion
Black Olives
....and whatever else you may want to throw on.

First layer:

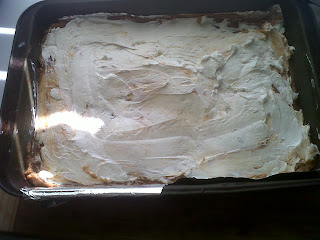
Mix refried beans and spread over a 9x13 baking dish.


Second Layer:

Mix sour cream and cream cheese and spread over beans.


Third and Fourth Layer:

Spread salsa over the cream cheese mixture and then sprinkle shredded cheddar over the salsa.  This helps keep the next layer, lettuce from wilting.


Fifth, Sixth, and Seventh Layers:

The last layers are your veggies, lettuce, tomato, onion.  And lastly, cheese and black olives.


Saturday, September 10, 2011

The Week in Review...

Another week with not much time to write.  Let's see what I made...

Baked Chicken, Bacon Ranch Pasta & Bake Potato

Apple Crisp & Ice Cream

English Muffin Pizzas

Portabella Mushroom & Italian Sausage Lasagna


Wednesday, September 7, 2011

Chicken Soup for the Cold/Flu

The change in weather seems to have brought the flu/cold to our household.  First, my son Jake started coughing, then my daughter Skye.  Next went my husband and yesterday, ME.  A batch of homemade chicken noodle soup, is just what this holistic healer ordered.


Homemade Chicken Noodle Soup

This recipe is once again one that came from my mother and was adapted by me for flavor reasons.  Yesterday I did some research on why chicken noodle soup is always recommended and what could I add to my recipe to make it's healing powers even better. Each ingredient in this soup is good for you in its own way and adds to helping you feel better. 

Here is a great article about why Chicken Noodle Soup is super food when you are sick. 


What you need:

1 Whole Chicken
1 Sweet Onion, finely chopped
4 Cloves of Garlic, minced
4 Stalks of Celery, finely chopped
2 c. Carrots, diced

Chicken Broth or Water
Salt
Pepper
Coriander Seed
Parsley
Thyme
Butter/Olive Oil
Egg Noodles (recipe below)

In a stock pot, add a couple tablespoons of butter and a couple tablespoons of olive oil then add all of your vegetables and spices.  Saute until veggies are hot and just starting to cook down. 


After rinsing your whole chicken thoroughly, add it to the veggie mixture and cover in water.


Simmer for several hours until the chicken wings pull away easily from the rest of the bird.  Remove the from pot and let chicken cool until you can touch it comfortably.  Next, take off the skin and throw it away.  Take all of the meat off the bone, being very careful not to miss any small bones which could choke someone.  Then dice up the chicken and set aside.

Once you remove the chicken from the pot, you will notice the broth level disappear.  I like to use canned broth instead of water to refill the pot.  Bring your pot of stock and veggies to a boil and add your egg noodles.  I like to cook the noodles without the chicken at first.  After the noodles are done, add the chicken and simmer until you are ready to serve.

Egg Noodles

2 1/2 cups all-purpose flour
1 pinch salt
2 eggs, beaten
1/2 cup milk
1 tablespoon butter

Mix salt and flour and set aside.  Then mix the rest of the ingredients together.  Pour wet ingredients into dry, mix well.  On a floured surface, knead your dough and roll out into a thin square.  A pizza cutter works great to cut your noodles fast and straight.  Use immediately or let dry completely for later use.

Monday, September 5, 2011

Slow-Smoked Baby Back Ribs

It's Labor Day! Most Americans are enjoying this day off by firing up their BBQ's for one last summer fun day in the sun. My family is no different. My cousin Kate and her clan are coming over today for slow-smoked baby back ribs and some outdoor fun.

Iowa's weather has always been unpredictable, but last week's highs hit 100 degrees and today we'll be lucky to hit 70 degrees, a welcome change for me. This by far is my favorite time of year; unfortunately, we don't have many days like this ahead.

Iowa can go from summer heat to winter snow while winking at fall, as if to say, maybe next year you'll have a chance to stick around. Our warm days and chilly nights will soon be replaced with gray cloudy skies and dreary wet weather. The highs will soon only be in the 50's, then 40's and before you know it, it will be -30 degrees and hell on earth in my book, so today, we will bask in the sun, stuff our faces with delicious morsels and attempt to work them off with some volleyball, croquet or bad mitten.


Slow-Smoked Baby Back Ribs

My first attempt at smoking baby back ribs was a disaster. I had just bought my cherished dual grill. Gas on one side and charcoal on the other, but I had no idea what I was doing. I didn't know about direct heat and indirect heat, nor did I know about the essential water pan to add moisture to the smoking process and let's not forget soaking your woodchips to avoid burning. I didn't know that either. Lastly, I didn't know about the slow and low rule. I instead, grilled these expensive ribs at about 400 degrees. Luckily I make killer BBQ sauce so they tasted okay if you could get past the wood/rock like exterior. Who am I kidding? They were awful!!


I then educated myself by reading every blog, article and website I could about smoking meats. This is what I learned:

1.      Start with a great cut of meat. Don't buy frozen, instead go to your butcher or meat department at your local grocery and buy fresh!

2.      Remove your meat from the refrigerator and allow to come to room temperature.

3.      Rinse your rib racks in cold water.

4.      If you're not going to hang your ribs, remove the membrane off of the back. This is kind of tricky and does take some practice, but well worth the time and effort in the end. A Phillips head screwdriver seems to work the best. Insert the screwdriver in the center and gently pry backwards until you can pull off the membrane. Use a paper towel as the membrane is pretty slippery and allows better grip.

5.      Rinse and pat dry.

6.      Apply a thin coat of yellow mustard prior to applying your rub. This will not give your ribs a mustardy flavor; instead it works as a binding agent between the ribs and the rub you apply. A rub is a mixture of spices you apply to your meat before you start the smoking process. Rubs are generally applied 24 hours prior to smoking, but if you are short on time, 30 minutes at room temperature will suffice.


7.      Soak your wood chips thoroughly! A couple hours at least! I like to use hickory, apple and cherry for smoking ribs.

8.      Get your smoker ready! If you have a charcoal grill, like me, you can easily convert it to a smoker with a few items and some know how. Smoking requires indirect heat, so arrange your coals around your water pan which is directly under your meat. I like to have the coals and wood chips on one side of the grill, but I have seen people smoke in the center with coals on either side. As long as your coals are not under your meat, you will be fine.

9.      Allow your coals to burn for at least 15 minutes prior to adding your ribs. You want these ribs to cook SLOW AND LOW, so it is important to make sure the temperature does NOT surpass 250 degrees. 200-225 degrees is your target temperature, so if you are burning too hot, remove some coals and not burning hot enough, add some more. You will want to start off with about 15 briquettes. I use a charcoal starter rather than lighter fluid, so I don't have a chemical taint to my food. The cost is about $10 for a charcoal starter and well worth it!

10.  Once your grill is at the optimum temperature, add your presoaked wood chips to the hot coals.

11.  Place your ribs bone side down, making sure they are NOT overlapping and are NOT anywhere near the coals. You can't undo crispy or burnt.

12.  BE PATIENT! Resist opening the lid. Yes they are beautiful and the smoking process is pretty cool to watch, but every time you open the lid, you let out heat messing with your cooking time and progress.

13.  Check the ribs for the first time after about 20 minutes. Apply your mop sauce very thin and turn over. Repeat about every 30 minutes thereafter. Each time you check you ribs, you MUST pay attention to the temperature. 15 coals are not going to cook these ribs all day at 200 degrees. You will have to add more coals a few at a time as needed. It's important to utilize your charcoal starter for this. Simply throwing on some briquettes will result in a way too hot grill temperature.

14.  5-8 hours is how long these baby backs can take, sometimes longer. When the meat starts to pull away from the bone easily, your ribs are done. If you have a meat thermometer, you are looking for an internal temperature of 205 degrees between the bones. I do NOT use a thermometer, not even when making candy, but if you are new to cooking and are having guests you want to impress, get one!

15.  Wrap in foil and allow to rest once done. This will also allow you time to finish up any side dishes you

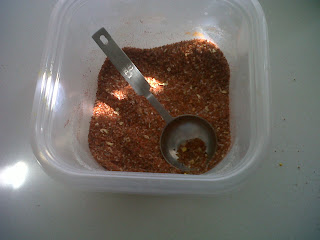
Rub Recipe

1/2 c. DARK Brown Sugar

1/2 c. Kosher or Sea Salt (NOT TABLE SALT)

1/2 c. Sweet Paprika

6 T. Black Pepper

2 T. Garlic POWDER (not garlic salt)

2 T. Dried Onion Flakes

2 tsp. Cayenne Pepper

Directions:  Mix All Together,Thoroughly!


Mop Sauce Recipe

1/2 c. Apple Cider Vinegar

1/2 c. Water

1/2 c. Ketchup

1/2 c. Dark Brown Sugar

4 T. Yellow Mustard

2 T. Minced Garlic

4 T. Minced Onion

3 T. Olive Oil

1 T. Garlic Powder

1 T. Chili Powder

1 T. Onion Powder

1 tsp. Red Pepper Flakes

1 tsp. Cayenne Pepper

Directions:  Combine all ingredients in a sauce pan and bring to a boil, then cool.

MIA But Still Cooking!!


No one said raising a family is easy and my family is about as dysfunctional as they come. We love unconditionally and are as loyal as can be, but that doesn't mean my boys don't find trouble...all the time!! 
For anyone who thinks they don't have problems; you are in denial, plain and simple. 
Our problems, unfortunately, get spread like wildfire, mountains made out of mole hills and the gossip, which is rarely true, still sparks unneeded drama usually resulting in the police visiting my home.  Needless to say, I have been MIA due to family issues, but I am happy to report.... I have returned!  Finding time to write about my cooking adventures has taken a back seat as of late, but that doesn't mean I haven't been cooking.

Football season kicked off Saturday with my beloved Iowa Hawkeyes slaughtering Tennessee Tech.  I couldn't have asked for a better start to College Football, even with the rain!  With two boys, my husband, my daughter and I all liking different NFL teams, the only thing we can agree on is our HAWKEYES.  There is always a game on we MUST watch and with each game there has to be food, snacks and beverages.

I am going to be trying a ton of new recipes this year while keeping some of our favorite tailgating dishes around.
Snacks Recipes to Come:

Pickle Wraps
Cucumber Sandwiches
Crispy Fried Hot Wings
Turkey Meatballs

Chicken Wraps
Crab-Stuffed Mushrooms

Seven Layer Taco Dip

Crockpot Chili Con Queso
Sweet and Spicy Lil' Smokies

Bacon Wrapped Water Chestnuts
Buffalo Chicken Dip

Pigs in a Blanket
Bacon Wrapped Crackers

Beer Bread with Spinach Dill Dip

These are just a few of the snacks coming to my living room this football season. 


Saturday = College Football and the occasional NFL, Sunday = NFL, Monday = NFL, and now even Thursday = NFL in this house. One would think this is a bit much, but not for this household. We love our FOOTBALL!! 


GO HAWKS!!


 GO VIKES!!

Sunday, August 21, 2011

Sweet Italian Sausage Meatballs

I must admit, spaghetti is probably my least favorite food, but my family LOVES it.  Meatballs, however are another story.  I cannot get enough! I have made several different kinds of meatballs over the years; turkey, beef, pork and a combination.  Out of all of them, I prefer sweet Italian sausage meatballs.

Sweet Italian sausage (the good stuff anyway) isn’t found at Wal-Mart or in the freezer section of any grocery store.  It is made by the grocery store and found in the fresh meat section.  In Iowa, I can only find “Sweet Italian Sausage” at one store and luckily I only live a block away as I love to use this sausage instead of ground chuck. 
Family Foods is our local grocery store here in Tipton, Iowa and coincidentally it was also the local grocery store in the small town where I grew up.  My son, Jake works at the one in Tipton and did work at the one in my home town prior to us moving.  Love the store, but watch your prices, some items can be well above what you might pay compared to Wal-Mart, but if you are anything like me, I like to shop local rather than give my money to large corporation who care only for their profits rather than their employees and customers.  Family Foods meat department is amazing and resonable!  Plus the quality surpases that of Wal-Mart every single day.  They also sell a "Pit Ham"  that my mother and I swear by.   
Sweet Italian Sausage Meatballs

What you need….
1 Sweet Onion, diced
5 cloves of Garlic, minced
2 pounds Sweet Italian Sausage
2 Eggs
½ cup Milk
Worcestershire Sauce
Red Pepper Flakes
Black Pepper
Salt
Garlic Powder
Onion Powder
Seasoning Salt
Parsley
Basil
Bread Crumbs


Dice your onion and garlic.  I like to dice veggies fine due to a picky daughter who thinks because my mother doesn't eat certain things, she shouldn't either.  I started disguising them in sauces she loves and telling her after the fact they were in there.


Add eggs.


Add the rest of the seasoning ingredients and mix well.


Then add your sausage.


Lastly, add your breadcrumbs.


Mix well.  I use a wooden spoon but a lot of people like to use their hands to really work everything together.


Make into bite size meatballs.  There is nothing worse than trying to eat spaghetti with meatballs too big to fit in your mouth.  It might take a bit more time to make them smaller as their will be more to make, but your dinner guests or family will appreciate it!


Bake at 400 degrees until the tops begin to turn brown.


Transfer meatballs from oven directly into your pot of sauce and continue to simmer.  If you aren't sure if they are done or not, the best advice is to cut one in half to see.  I make my own sauce, but not everyone has that much time.  Meatballs are a great way to turn a store bought sauce into a labor of love for your family!


Seasoning amounts are missing from this recipe and pretty much all of my recipes because:

  1. I don't measure anything except for when I bake (and sometimes not even then).
  2. Each person enjoys different amounts of flavor. 
I am a smoker.  I know for shame, for shame, but that means my taste buds aren't as aware as non-smokers.  Needless to say, BOLD FLAVOR is how I cook.  With meatballs, 1-2 teaspoons is probably plenty for each.  Less on the spicy seasonings if you prefer a mild flavor.


Tuesday, August 16, 2011

Caramel Apple Pie

My son, Jake, commanded the kitchen tonight with this pie....it was almost all him!!


I can make a heck of a pie crust, but the truth is, it's a step I would rather not do and have to clean up, so usually I buy prepared pie crusts in the refrigerater section at the grocery store.   You can do whichever you prefer for this recipe.

In you pie pan, start with one pastry crust on the bottom.  Next layer 6 cups apples, with 3 T. flour, 1/2 c. sugar.  Meanwhile, melt 1/2 a stick of butter, 1 c. brown sugar, and 1/4 cup milk.  Simmer until butter is completely melted and remove from heat and add 1 tsp. Almond flavoring.  Poor over apples in your pie crust.  Top with a mixture of 1 c. brown sugar, 1/2 c. flour, 1/2 c. rolled oats cut with 1/2 c. butter.  Bake at 375 degrees for 40-50 minutes.  Serve with vanilla ice cream.

This was lush, enjoy!!

BBQ Chicken, Hashbrown Casserole, Baked Beans and Macaroni Salad

Last night I cheated and took the family to Subway, so tonight I cooked up a feast!  BBQ Chicken on the grill accompanied by a cheesy hasbrown casserole, baked beans and the ultimate macaroni salad.  I spoke of this salad a few weeks ago and ended up making an Italian pasta salad instead, so this tonight you all will finally get the recipe.

BBQ Chicken

My family loves chicken legs and I like breast meat, so I usually buy a bunch of legs and a whole chicken which I cut up later.  I wait for whole chickens and legs to go on sale and then buy a bunch and throw them in the freezer.  You can save yourself a ton of money if you learn to cut up a chicken yourself.  It's not that hard if you have the right tools.  Wings, then legs, cut out the back, then the thighs, split the breast.  Takes some time, but once you get the hang of it 10 minutes will take care of it and save your pocket book.

Now this recipe is gonna sound strange as this is cooked on the grill.  But I give the chicken pieces a coating before placing on the grill.  I have found this locks in the juices and almost makes the chicken underneath similiar to broasted chicken.

I brine my chicken pieces in a mixture of sea salt, pepper, sugar, paprika, garlic powder, onion powder, chili powder and water.  The important thing to remember about brining is to make sure your salt and sugar has dissolved prior to adding your chicken.  For cut up chicken pieces, only a few hours are needed for this brining process.  It's worth it!


After the bringing process is complete rinse your chicken pieces and pat dry.  Dip in the buttermilk or egg mixture then flour and set aside.


Meanwhile, get your grill fired up.  I prefer to use charcoal as the flavor is so much better than gas.  I also use a charcoal starter instead of lighter fluid, as the chemicals can taint the flavor of your food and we don't want to have that now, do we.


Throw you chicken on the hot grill, the flour outer coating will begin to get crispy under the heat just like you are frying this in oil.  Continue grilling flipping the chicken often to ensure it doesn't burn.  Keep a spray bottle of water handy to put out any fires that may expode, but be warned grease fires and water do not mix, if the chicken fat is on fire and you spay water on the fire it will engulf in flames, so be careful. 


After the chicken is done grilling, transfer to a baking sheet.  Before putting this chicken in the oven, take a bowl and fill it with your favorite barbeque sauce.  My family prefers Sweet Baby Rays, we buy nothing else.  Bake in a 400 degree oven until the BBQ sauce is bubbly.


Cheesy Hashbrown Casserole


This is one of my all time favorite side dishes. 

What you'll need:

Bag of Frozen Hashbrowns

1 Family Size Can of Cream of Chicken Soup

8 Ounces Sour Cream

3 Cups Cheddar Cheese

1/2 Stick of Butter

Corn Flake Crumbs

Salt

Pepper

Seasoning Salt


Directions:

Thaw hashbrown and put into a greased 9x13 baking dish.  Next add a cup of the cheddar cheese and mix in with the hashbrowns.  Season hashbrowns with salt, pepper and seasoning salt.  In a seperate bowl mix cream of chicken soup, sour cream, salt, pepper and seasoning salt.  Pour over the hashbrowns.  Top with cheddar cheese, then corn flake crumbs and pour melted butter over the top.  bake at 350 degrees for 30 minutes or until the top is golden brown.


Baked Beans

What you'll need:

Large Can of Pork and Beans.  (I prefer Van Da Kamps)

1/2 cup Brown Sugar

2 Tablespoons Vinegar

1/2 cup Catsup

1/2 a Sweet Onion diced

1/2 a pound of Bacon cut into pieces.

2 teaspoons Yellow Mustard

Cut up your bacon into small pieces and fry until crispy.  Remove bacon from grease and drain on paper towels.  Using the same pan you fried your bacon in, using the reserved grease, thow in  your diced onions for just a few minutes.  Add all ingredients together in a greased baking dish and bake at 350 degrees for 30 minutes or until bubbling.


The ULTIMATE Macaroni Salad!!

What you'll need:

2 cups Manyonaise

1 can Sweetened Condensed Milk

1 Cup Sugar

1/2 cup Vinegar

1/2 cup Apple Cider Vinegar

1 tablespoon Horseradish Mustard

1 teaspoon pepper

1 Green Pepper, diced

2 cups Carrots, shredded

1 Roasted Red Pepper, Diced

1 Red Onion, diced

1 Sweet Onion, diced

1 cup Peas, frozen or fresh, NOT CANNED!

3/4 box of Elbow Macaroni

Cook macaroni, drain and run cold water over pasta until cool to the touch!  Get your veggies cut up and mixed together in a bowl and add cold macaroni.  In a seperate bowl mix remaining ingredients and blend well. Pour dressing over the macaroni and veggies.  Mix well and refridgerate for several hours before serving for optimum results.


Coming Next....Caramel Apple PIE!!!